Here comes the Guest blogger's space after a short gap! Till now, I was doing this space with my friends and non-blogger buddies. But I realized it is time to invite the you, the lovely bloggers out there, to adorn my blog with your fabulous recipes!
And the first person, who came to my mind was Sandhya Hariharan @ Sandhya's Kitchen. She remains a very special person to me always, as she was the first person to visit my blog and leave her comments. (I still remember the date: 22/09/09!) My joy knew no bounds when I received the first comment on my blog; I am sure all of us can remember that date, very much like the "first love" :D Thanks Sandy, you have no idea how much happiness your comment gave me! Those who haven't yet had a chance to peek in her kitchen, please do it right away. She has a lip-smacking collection of recipes with great clicks!
Over to Sandhya:
Hi I am Sandhya Hariharan .. My friends call me Sandy.. For tat matter my little one calls me San ,Sandy & Sandhya..... Amma..
This is my first guest Host in 10 months of blogging !! Thank you Rohini....Muwaah ..
Meet Sandhya:
Well.. Its ages I have written something about myself.. Last I wrote was for my campus interview ..lol ..
A South Indian having her upbringing in Mumbai... This is what I would call myself.. A total blend in culture ...coz I have been rared for 15 years of my early life which I can hardly forget... Lived in Chennai , B'lore and now in London... I love travelling to new places , learning their food culture.. and having it in my kitchen.
Meet Sandhya's Kitchen:
My Love & Passion for Cooking grew after meeting this handsome Hunk Hari who would never tired of praising & appreciating everything I cook. No matter how disastrous it could be. By Product of this Passion is Sandhya's Kitchen.
Sandhya's Kitchen is a very passionate culinary corner where I ponder & experiment Cooking. Looking forward to make it a one-stop location for any kind of Vegetarian Breaks in years to come.
I would take this lovely opportunity to thank all my blogger friends who visit my blog and shower their lovely comments. I have grown a lot in my cooking and as a person .. in these 10 months..
Inspiration/role model/favorite cook:
South Indian cook in me is very much what my mother has imbibed... Now I'm learning in bits and pieces from my Mil , Granny.... and of course my mom...
My Inspiration:Gordon Ramsay.. I love the way he does it . I totally admire his art of putting together the right ingredients and bringing the right flavours. The way Gordon presents food in Tele shows...
Favorite Cuisine: Mumbai street food / Thai food
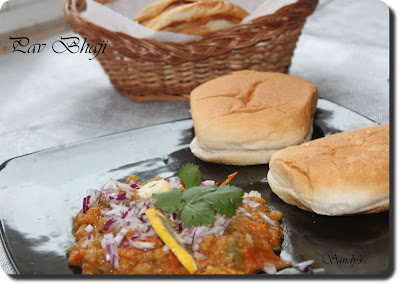
Recipe Name: Pav Bhaji
This recipe is no new to anyone... But I have grown with this recipe.. I could cook Pav Bhaji since when I was in Class 9 .This recipe has been improvised in flavours and ingredients as I have grown and finally compiled into the final version.
I have posted this recipe when I begun my blog.. and have been updated with better pictures from time to time. Find this recipe in my blog here.

INGREDIENTS:
Sunflower oil - 2 Tsp
Chopped garlic - 3 cloves(optional)
Finely chopped green chillies - 1-2 Nos (depending upon hotness)
Medium sized onions - 2 Nos chopped finely
Freshly grated ginger - 1 Tsp
Medium size Tomato - 4 Nos diced finely
Cauliflower florets - 1/2 cup
Green Pepper - 1 Nos chopped finely
Green Peas - Handful
Carrot - 1/2 Cup
Potato - 3-4 Nos boiled &mashed
Powders & Garnishing:
Pav Bhaji masala - 2-3 Tsp( I have used an Everest one)
Turmeric Powder - 3/4 Tsp
Chilli Powder - 1/2 Tsp
Salted Butter - 50 gm
Salt - To Taste
Lemon Juice - 3-4 Tsp
Coriander Leaves - 1/4 cup
For Serving:
Sliced Lemon - 4 pieces
Dinner Rolls(Pav) - 8
Salted Butter - 10gm
Finely chopped onions - 1/4 cup
Sliced Lemon - 4 pieces
Cheese - Optional
Directions:
Cook cauliflower,peas,carrots,green pepper together in a pressure cooker and keep it aside.
Heat 2 tsp oil in a pan .Add garlic & green chillies and saute for 30-40 seconds. Now add ginger & onions and saute until it turns light brown. Add a pinch of salt while frying onions. It will help to evaporate the water & fry quickly.
Add the diced tomatoes to it and cook on medium heat for three to four minutes, stirring continuously or till oil separates from the masala.
Add turmeric powder, red chilli powder , 1 tsp pav bhajji powder to the mixture.
Now add the cooked vegetables & mashed potatoes to this mixture along with 1-1.5 glasses of water. Using a potato smasher, press the vegetables a few times till all of them are completely smashed.Bring it to a boil and simmer for ten minutes. Add the rest of the pav bhaji masala and salt now.
Cook on medium heat for 2-3 minutes and stir continuously.
Garnish the bhajji with chopped onions and lemon juice.
For Serving:
Heat some butter in a tawa. Slice pav horizontally into two and pan fry in butter for half a minute, pressing two or three times or till pav is crisp and light brown.
Garnish the bhaji with chopped coriander leaves, a little of butter and serve hot with pav accompanied with remaining chopped onion and lemon wedges.
And the first person, who came to my mind was Sandhya Hariharan @ Sandhya's Kitchen. She remains a very special person to me always, as she was the first person to visit my blog and leave her comments. (I still remember the date: 22/09/09!) My joy knew no bounds when I received the first comment on my blog; I am sure all of us can remember that date, very much like the "first love" :D Thanks Sandy, you have no idea how much happiness your comment gave me! Those who haven't yet had a chance to peek in her kitchen, please do it right away. She has a lip-smacking collection of recipes with great clicks!
Over to Sandhya:
Hi I am Sandhya Hariharan .. My friends call me Sandy.. For tat matter my little one calls me San ,Sandy & Sandhya..... Amma..
This is my first guest Host in 10 months of blogging !! Thank you Rohini....Muwaah ..
Meet Sandhya:
Well.. Its ages I have written something about myself.. Last I wrote was for my campus interview ..lol ..
A South Indian having her upbringing in Mumbai... This is what I would call myself.. A total blend in culture ...coz I have been rared for 15 years of my early life which I can hardly forget... Lived in Chennai , B'lore and now in London... I love travelling to new places , learning their food culture.. and having it in my kitchen.
Meet Sandhya's Kitchen:
My Love & Passion for Cooking grew after meeting this handsome Hunk Hari who would never tired of praising & appreciating everything I cook. No matter how disastrous it could be. By Product of this Passion is Sandhya's Kitchen.
Sandhya's Kitchen is a very passionate culinary corner where I ponder & experiment Cooking. Looking forward to make it a one-stop location for any kind of Vegetarian Breaks in years to come.
I would take this lovely opportunity to thank all my blogger friends who visit my blog and shower their lovely comments. I have grown a lot in my cooking and as a person .. in these 10 months..
Inspiration/role model/favorite cook:
South Indian cook in me is very much what my mother has imbibed... Now I'm learning in bits and pieces from my Mil , Granny.... and of course my mom...
My Inspiration:Gordon Ramsay.. I love the way he does it . I totally admire his art of putting together the right ingredients and bringing the right flavours. The way Gordon presents food in Tele shows...
Favorite Cuisine: Mumbai street food / Thai food
Recipe Name: Pav Bhaji
This recipe is no new to anyone... But I have grown with this recipe.. I could cook Pav Bhaji since when I was in Class 9 .This recipe has been improvised in flavours and ingredients as I have grown and finally compiled into the final version.
I have posted this recipe when I begun my blog.. and have been updated with better pictures from time to time. Find this recipe in my blog here.

INGREDIENTS:
Sunflower oil - 2 Tsp
Chopped garlic - 3 cloves(optional)
Finely chopped green chillies - 1-2 Nos (depending upon hotness)
Medium sized onions - 2 Nos chopped finely
Freshly grated ginger - 1 Tsp
Medium size Tomato - 4 Nos diced finely
Cauliflower florets - 1/2 cup
Green Pepper - 1 Nos chopped finely
Green Peas - Handful
Carrot - 1/2 Cup
Potato - 3-4 Nos boiled &mashed
Powders & Garnishing:
Pav Bhaji masala - 2-3 Tsp( I have used an Everest one)
Turmeric Powder - 3/4 Tsp
Chilli Powder - 1/2 Tsp
Salted Butter - 50 gm
Salt - To Taste
Lemon Juice - 3-4 Tsp
Coriander Leaves - 1/4 cup
For Serving:
Sliced Lemon - 4 pieces
Dinner Rolls(Pav) - 8
Salted Butter - 10gm
Finely chopped onions - 1/4 cup
Sliced Lemon - 4 pieces
Cheese - Optional
Directions:
Cook cauliflower,peas,carrots,green pepper together in a pressure cooker and keep it aside.
Heat 2 tsp oil in a pan .Add garlic & green chillies and saute for 30-40 seconds. Now add ginger & onions and saute until it turns light brown. Add a pinch of salt while frying onions. It will help to evaporate the water & fry quickly.
Add the diced tomatoes to it and cook on medium heat for three to four minutes, stirring continuously or till oil separates from the masala.
Add turmeric powder, red chilli powder , 1 tsp pav bhajji powder to the mixture.
Now add the cooked vegetables & mashed potatoes to this mixture along with 1-1.5 glasses of water. Using a potato smasher, press the vegetables a few times till all of them are completely smashed.Bring it to a boil and simmer for ten minutes. Add the rest of the pav bhaji masala and salt now.
Cook on medium heat for 2-3 minutes and stir continuously.
Garnish the bhajji with chopped onions and lemon juice.
For Serving:
Heat some butter in a tawa. Slice pav horizontally into two and pan fry in butter for half a minute, pressing two or three times or till pav is crisp and light brown.
Garnish the bhaji with chopped coriander leaves, a little of butter and serve hot with pav accompanied with remaining chopped onion and lemon wedges.


